Manda Makes a Game Part 5: Foraging for Materials and Graphics
Right from the start of this project, I knew one of my challenges was going to be not going completely nuts buying/making props for this game. After all I had a budget to keep in mind not to mention shipping considerations. Being the only Canadian in the group, I had no choice but to ship internationally, so every gram I chose to put into my game had to be chosen carefully.
Another challenge was my own handicraft abilities, or lack thereof. Weirdly, working with my hands is incredibly calming for me and whatever school construction or craft projects I’ve had in the past have been very enjoyable despite the subpar results.
But for some reason, it was never a skill I honed, and so here I am at 40 wondering how the heck to not just gather all these materials together, but to build a couple of the props seemingly from scratch.
So…I had many things to get, and a few options by which to get them.
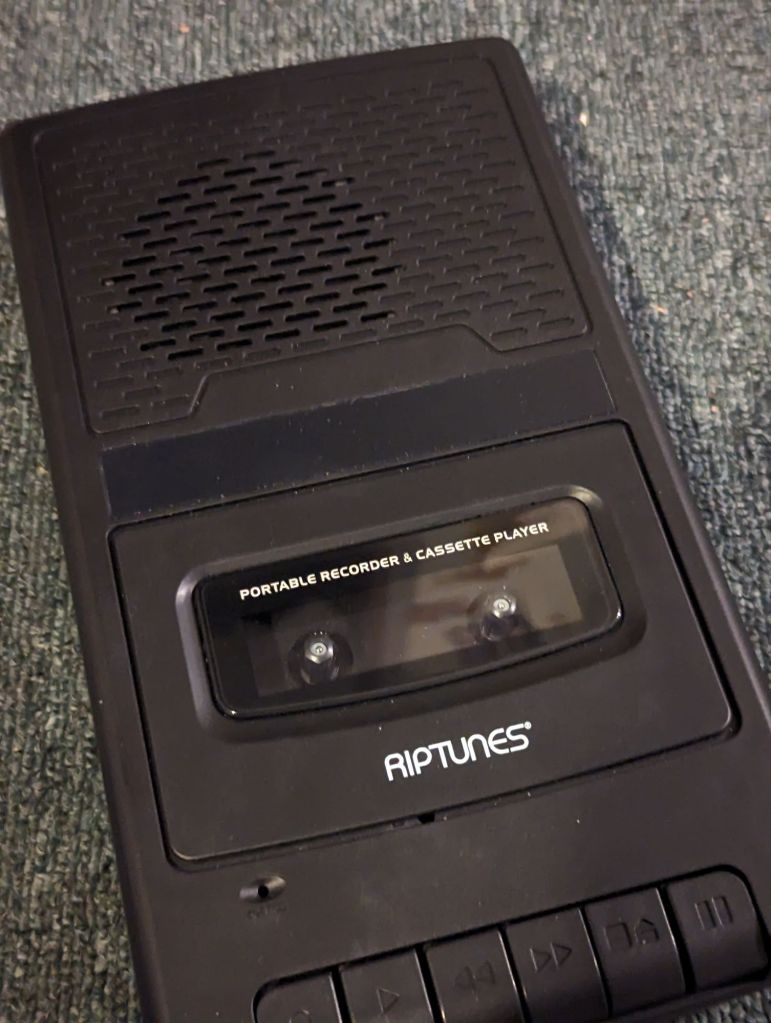
Cassette Player
Obviously as soon as I got my idea for having a game playing on cassettes, I had to see how possible it was to even get a portable cassette player and cassette in the 21st century.
As it turns out, it was fairly easy. Unfortunately it meant going to the dreaded Amazon to order, which…well, I had to do a for a few things in this process. I tried to have it as a last resort, but even living in a big city there were limitations as to what I could find nearby.
And Amazon had a wide selection of handheld cassette players. I would not have a difficulty finding one.
I bought three.
Now, before you judge too harshly…no, actually, judge all you like. These were definitely purchased on impulsive instincts. The first tape recorder I bought was one that reminded me of my own childhood: a big, clunky thing with a record option and a fun handle to carry around all your embarrassing recordings.
My initial excitement at its arrival was somewhat diminished when I noticed and friends pointed out “Oof…that’s a big item to ship, isn’t it?”
Yes…yes it was. So I ordered two more. First I ordered a lovely, small handheld device that even had a recording button. Huzzah! And for safety, I ordered another one that did not have a recording button to seemed, at least from reviews, to have a bit better sound quality and recorded MP3s (although I clearly did not read carefully about what that meant). The important thing was, they were both much smaller and would serve my purposes shipping wise.

As it turned out, I need not have worried. Shortly after receiving my Secret Santa’s name, out of curiousity I emailed her and asked if she had a tape recorder. She did! This much lessened my shipping needs but as a result…I now own three tape recorders.
The tapes as well were relatively easy to get from Amazon. I bought 2 initially with the cassette recorder for proof of concept, then once I figured it would be decent, I ordered a 12-pack.
How I went about recording and choosing what machine would do what is another blog post entirely. Stay tuned for that.
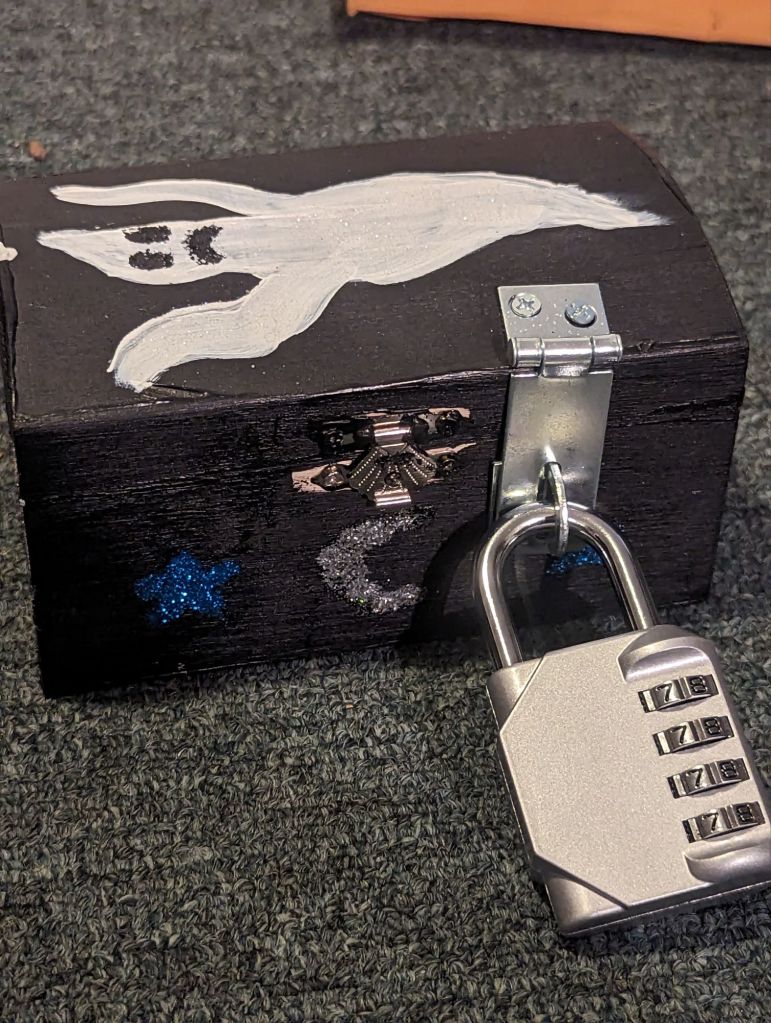
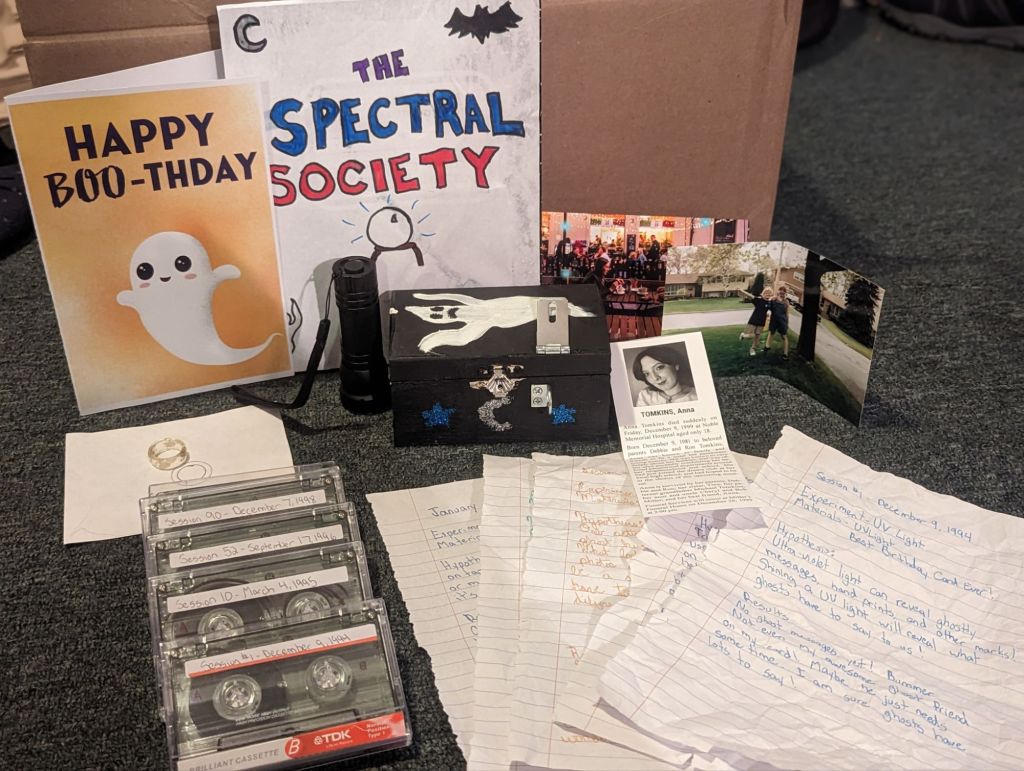
The Spooky Box
I had designed a lockbox into my game that was meant to be made by a 12 year old. This slightly stressed me out (see aforementioned lack of craft abilities). Finding a small, light wooden box that I would have to decorate AND possibly attach a lock onto? This was a bit daunting.
I stopped by my local art supply store and managed to find a set of plain, wooden nesting boxes. Perfect. This would allow me to have options for sizes as well as options in case I massively screwed up one of the boxes. You see, the boxes didn’t have a latch that a lock could fit around. I would have to attach it myself. I also purchased some cheaper craft paint with which to paint it.

Initially, I went to Amazon for a latch I could attach to the box. It did not occur to me that going to the hardware store would be the easier option. I am…intimidated by Canadian Tire and its myriad of aisles. I should not have been. The latch I got was gigantic. A bit of wasted money there. Amazon was useful, though, for getting a generic 4-digit lock.
Canadian Tire, our big home supply store here in Canada, ended up being my saviour for a lot of my supplies. I found a latch to attach to the box that was the correct size and a glue gun to help with the problem of pointy screws poking through the wood.

And of course, it would not be the 90’s without sparkles. My local dollar store provided me with all the colours of the rainbow.
The most challenging part, naturally, was installing the lock clasp. I used my drill (given to me by my loving and concerned family) to drill the screws of the clasp in. The problem was…the wood was very thin, so the screws were kind of loose and definitely poked through the other side of the wood. A hot glue gun helped me cover up the sharp bits so at the very least my Secret Santa would not hurt themselves.

At first, I sprinkled sparkles on top of what I painted but…it kind of looked uneven and patchy. I then realized using a finer paintbrush to paint everything in black and then dump sparkles overtop was far more effective. Then, to touch it up, I used a q-tip and liquid glue stick to apply glue overtop of the old sparkles to add new ones. The effect was… actually pretty great!

Graphics
Here is an area where I simply could not depend on my limited skills to produce anything decent. I didn’t care if my craft boxed looked kind of crummy, but I wanted to at least have professional looking graphics. So I asked my long-time and very dear friend, Kelsey, for some help. Kelsey is a very talented graphic designer and illustrator, and was more than willing to help me out. I should note that although I wasn’t able to offer much, it was important to me that I paid anyone I asked help from. I still feel like I owe Kelsey, though, because she did a fantastic job.
I was probably the worst client for Kelsey, a classic case of knowing what I want but having no idea how to describe it in words. Kelsey was patient with me, thankfully, but I can imagine having to translate this:

To this:
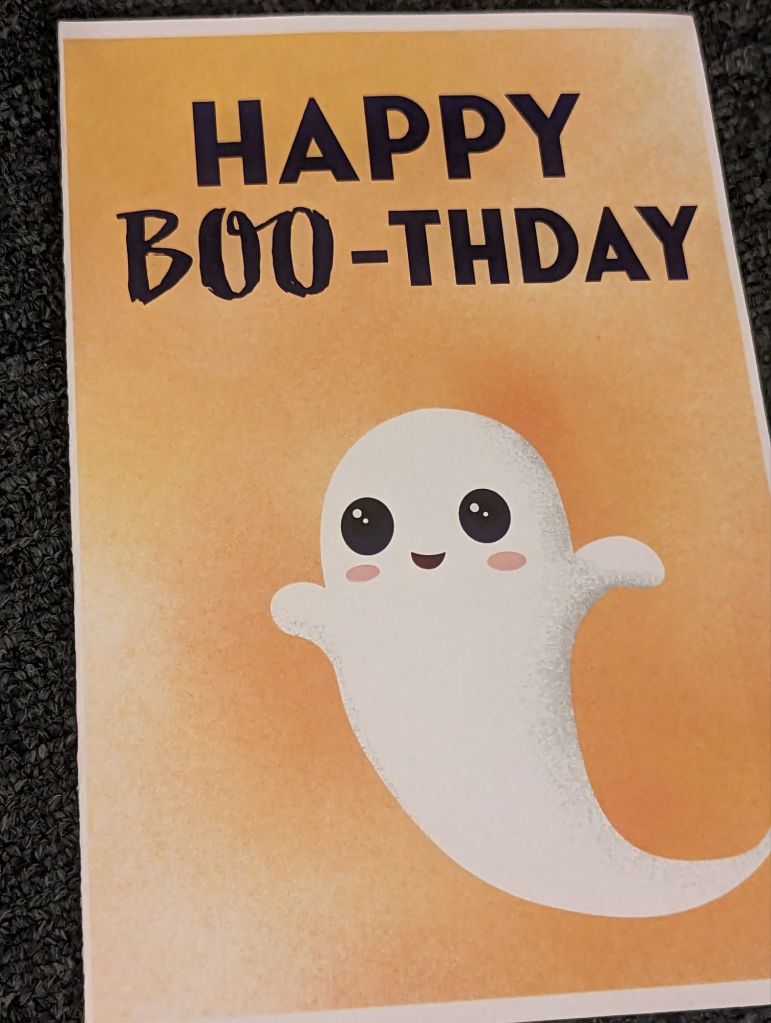
Was not an easy job, especially since I had vague puzzle requirements. But look at it! IT’S SO CUTE AND PERFECT!
Kelsey also designed the obituary I would have for Anna. I won’t show a close-up here because Kel chose to use her own image of herself at 18, so for privacy reasons I won’t display it fully. Needless to say it was so perfect and 90’s. All you need to know is that it involved a dolphin necklace.
Kelsey also helped out with the photo for the orb activity puzzle. I went to Unsplash on Kelsey’s suggestion to find a stock photo of a couple eating at a restaurant that were far enough apart you could fold the photo in. It took some sifting through algorithms, but I managed to find one:

I then sent it to Kelsey with my MS Paint example of what it would do.
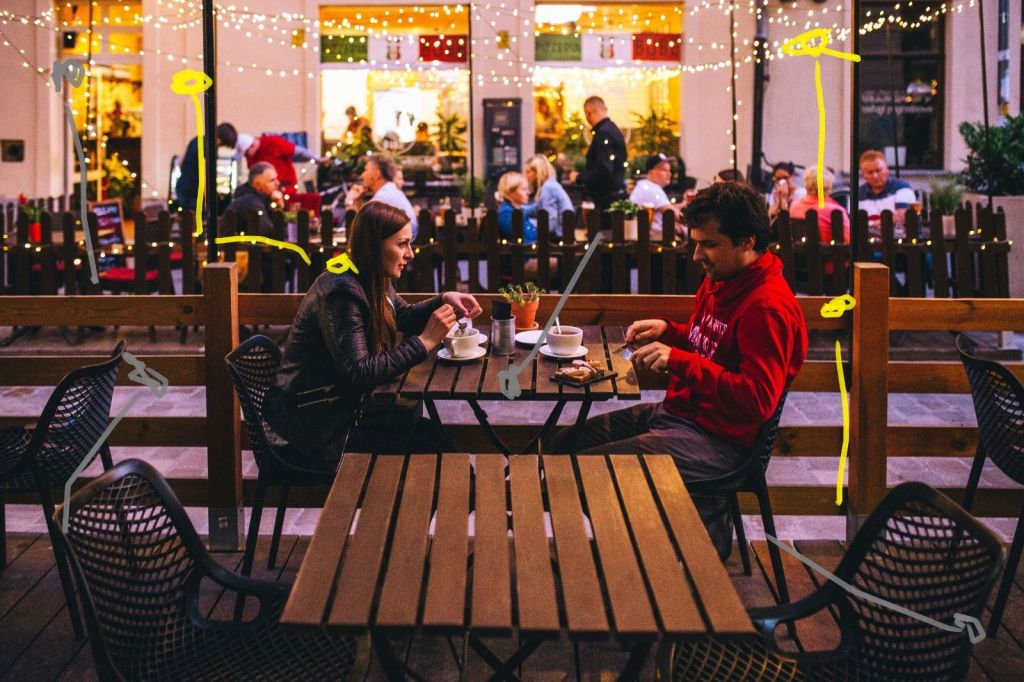
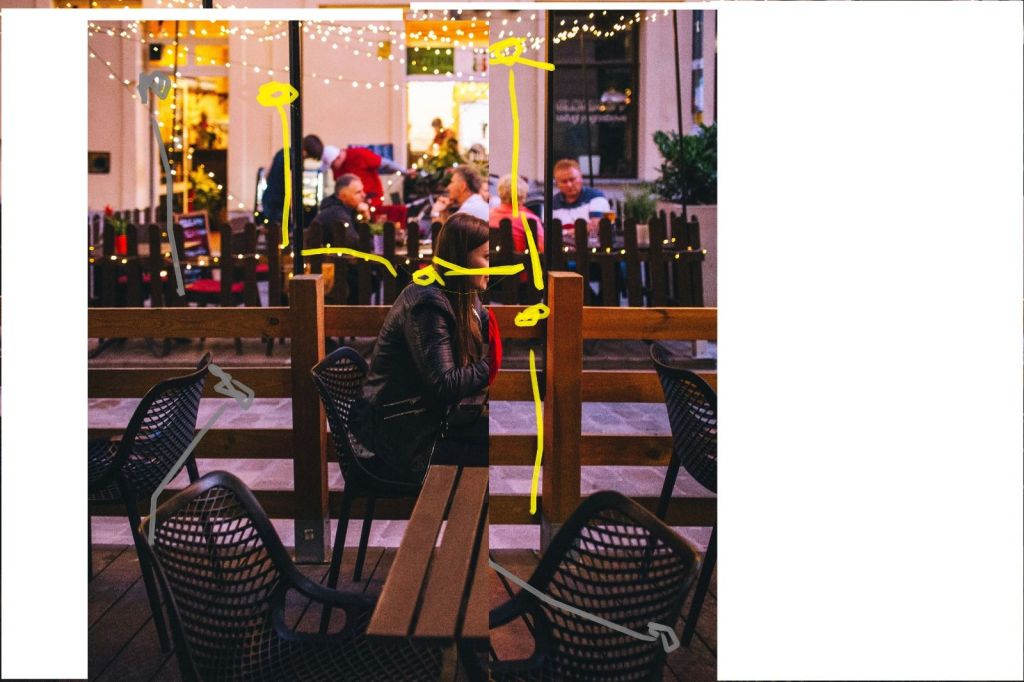
And Kelsey gave me two versions: one without streaks connecting the orbs and one with streaks. I had asked for that second one, but realized Kelsey was right and the one without streaks worked better. Plus, I could use the UV pen instead to put “invisible” streaks in there.

Once Kelsey had all of the files ready, I went to my nearest office store which had a printing centre and a photo kiosk to print everything out!
Childhood Photo
Because Kelsey had decided to use her own photo for the obituary, this made choosing a childhood photo of Becca and Anna relatively simple. I scanned an old photo of Kelsey and myself at 12 years of age (Yes, we have been friends for almost 30 years!), and printed out a few copies. The most difficult part of this process was getting all the dust off my scanner and photo so there would be no white flecks causing red herrings for players. Again, not going to post here for privacy, but it gave me lots of nostalgia.
Ring
I needed a ring for the trigger object puzzle. This would surprisingly prove to be one of my most challenging items to find. I bought a bunch of cheap rings from the dollar store to start. But they were a bit too small and thin.
I scoured other dollar stores, thinking this would be the best spot to find a cheap ring. I was wrong. Everything just did not look good on paper. I had been using a key ring as a stand-in during testing. I was almost going to use that because it was getting the desired effect I wanted: making a perfectly thin, round tracing that could easily be interpreted as the number 8. It wasn’t until I went to Claire’s, an accessory store for teens, that I finally found my perfect ring: a clunky, plastic thing that looked like it had walked out of the 90’s and made a wonderful number 8. Huzzah!

As for the other rings, they might not be a complete waste. I still want to make my jewelry box game, and they could work very well for that.
And the Rest
The rest were bits and bobs that were absolutely necessary but sometimes I didn’t think of until well into the process.
I had puzzles focused on UV and, as will be discussed in another post, a lot of opportunity to use UV for hints as well. Canadian Tire provided me with a UV flashlight and evil old Amazon gave me the UV pen.
I also needed a notebook that would serve as a journal. It being the 90’s, only sparkle pens would do for the journal entries. The dollar store gave me a notebook and the art store gave me some sparkle gel pens.
Of course I needed a way to group the materials and puzzles together, so I stocked up on some manila envelopes.
Other bits of paper and markers needed for colouring I would gather from around my house, so that was a relief.
I think overall, I spent about $275 in raw materials, most of that being toward the cassette recorders (all of them about $25 each) and including the reject materials but not including what I paid for services to friends helping me out. Not bad for a prototype but I definitely don’t like thinking too hard about it. Still, it was exciting to see this:

Eventually turn into this:
Overall, although time consuming, gathering my physical materials was quite manageable. This was good, because my biggest challenge was yet to come…The Recording…
Posted on January 29, 2024, in Uncategorized. Bookmark the permalink. Leave a comment.

Leave a comment
Comments 0